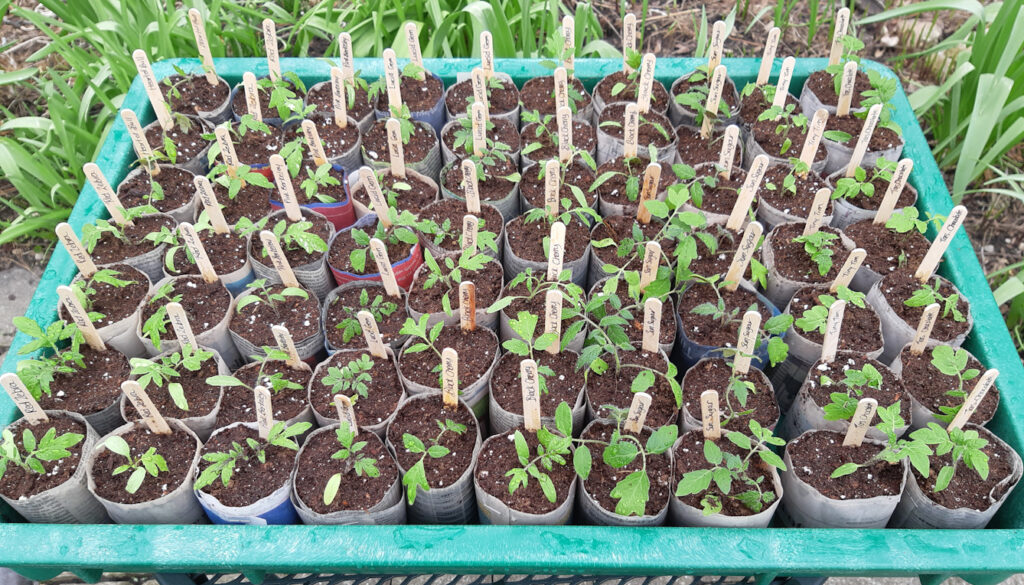
Seeds will thrive in almost any container as long as it has drainage for excess water. April and May is the perfect time to start seeds indoors and you can keep costs down by using recycled containers. You can make your own plant pots!
Why Make your own Plant Pots?
- they are free
- many of them can be planted directly into the ground where they will dissolve. This has 2 benefits – easier for you to plant and better for the plants as you are not damaging the roots.
- they are uniform in size so you can pack a lot of them into a tray with no wasted space allowing you to grow a lot in very little space.
Basic Supplies you may Need:
- Seeds
- potting soil
- Ruler
- pencil, markers
- scissors, tape
- trays
- plastic tablecloth
So let’s explore some ideas for pots
1. Make your own plant pots from Toilet Paper Rolls
- make short slits in several places on one end, then fold the bottom in to make a base
- add potting soil and plant a few seeds. Lettuce would be a great idea!
- Keep upright by putting several in a recycled container.
- Plop these seedlings in their cardboard rolls, directly into the ground on or after May 24th.
Kids will enjoy this crafty way to use toilet paper rolls. Check out this easy to follow video of a similar idea or read our simple steps below.
2. Make your own plant pots from newspapers
- build your own paper pots with sheets of newspaper
- cut a full newspaper (folded open) into long strips approx 10-12 cm (4-5 inches) long
- wrap this long strip of newsprint around a glass or piece of wood approximately 6 cm (3 inches) wide
- Fold the bottom inward for a base
- if your strips are wide, fold the top down inside a bit
- add potting soil and a few seeds. How about one or two tomato seeds?
- these paper pots can go straight into your outdoor garden bed or into a patio container on or after May 24th

Roll it up

Tuck in the bottom

Completed

Ready to fill with soil and seeds
3. Use Recycled cardboard or plastic juice boxes
- cardboard, plastic juice boxes, yogurt, or fast food containers also make excellent containers for starting small seeds.
- Parents – carefully punch a few small holes in the bottom of any plastic or hard cardboard container for drainage!
- If the bottom isn’t flat, just place them together and fasten them with packing tape to make a ‘group home’ for them so they are stable.
- IMPORTANT – remove the seedlings carefully from these containers and put them directly into a prepared hole in your soil. Don’t plant the hard cardboard or plastic ones directly into the ground and of course, when you’re done with them, just rinse out the cardboard or plastic containers and discard in your recycling bin.
More Recycling Ideas – RHS Campaign for School Gardening – Reduce the Use of Plastic
Other creative ideas for making your own plant pots
- Egg cartons
- Dixie cups, coffee cups (any kind of cup made of paper)
- Cereal boxes (or other light cardboard)
- muffin papers (used or new) in a muffin pan
- stale ice cream cones
Next Steps
Label Your Seed Pots!
You can make plant labels with old popsicle sticks or old plastic spoons or cut up pieces of old window blinds. Use a permanent marker and write the name for each pot. Depending on what pot you’re using, kids can also decorate the pots or labels with their own coloured markers.
Your garden will look organized and you can remember where and what you planted. Remember that when seedlings appear, it can be very confusing to identify which plant is which.
Care for your seedlings
Once you have planted your seedlings in their little pots, set them in your brightest window with a waterproof tray under them. A boot tray or rimmed cookie sheet would work well.
Check them every few days. Poke a finger into the soil. If it’s dry, add water. It’s important for little seedlings to not dry out but you also don’t want to drown them. I find they need water every 3-4 days.
After planting in the ground
Even after you plant in the garden after May 24th, keep an eye on the weather. If evening temperatures are expected to be cold you will need to protect those little seedlings.
If you have just a few plants, you can use recycled plastic pop bottles with the bottom carefully cut off and the bottle cap removed. Place this over as many seedlings as will fit to keep it snug and warm overnight. Be sure to remove in the early morning so you don’t cook them when the sun comes out as it becomes very warm inside the upturned bottle.
Another alternative is to cover the entire bed of young plants with a very light plastic tablecloth or an old cotton sheet. That will help hold in some of the leftover heat from the soil. Again, don’t forget to take the cover off in the morning!
Enjoy this activity to make your own plant pots with your family and see how enthused the children are by what they grow this year. It’s fun for kids to learn how to grow things and they may eat more vegetables too!
Here are some tips of what to plant and when
Recycling turns things into other things which is like MAGIC!
Thank you to contributors – Master Gardener Agnes Burroughs and tomato-grower extraordinaire Jennifer Smout. Images Credit- Jennifer Smout.

About The Author: Master Gardener
More posts by Master Gardener